Thursday 30 August 2012

diy: photo booth props

So I turned 20 last week, and Kelsey and I came up with the awesome idea of having a moustache themed party.  I love moustaches (as you could probably tell by this post) and I love throwing themed parties, so it was kind of a no brainer.

I have noticed a growing trend of photo booths at the weddings I have attended this summer, and I think they are so fun!  So we decided to make the party interesting we would make our own photo booth, along with lots of crazy props.

I invited my good friend Ashley over to help us make the props.  Ashley is extremely gifted when it comes to making paper crafts, and I knew we would benefit from her expertise.


It is easy and fun to make homemade photo booth props.  Start by drawing all the props onto a piece of card stock (you could also use cardboard, but we found card stock was easier to cut, and held up just fine).  


We first drew them in pencil, and when we were happy with them, outlined them with marker.


Cutting the card stock was no problem.  It is stiff without being too resistant.


We used cake pop sticks from Michaels, but any stick or skewer will do!  I was in charge of glueing on the sticks (since my drawing skills don't quite match Kelsey or Ashley's).  I made sure to position the stick first, and then glue it on.


I found the best way to glue them, was to put a dab of hot glue right on the back of the prop, and then place the stick in the glue and roll it around a bit.


Really it isn't a big deal if you mess up.  You should be able to carefully peel it off and try again.


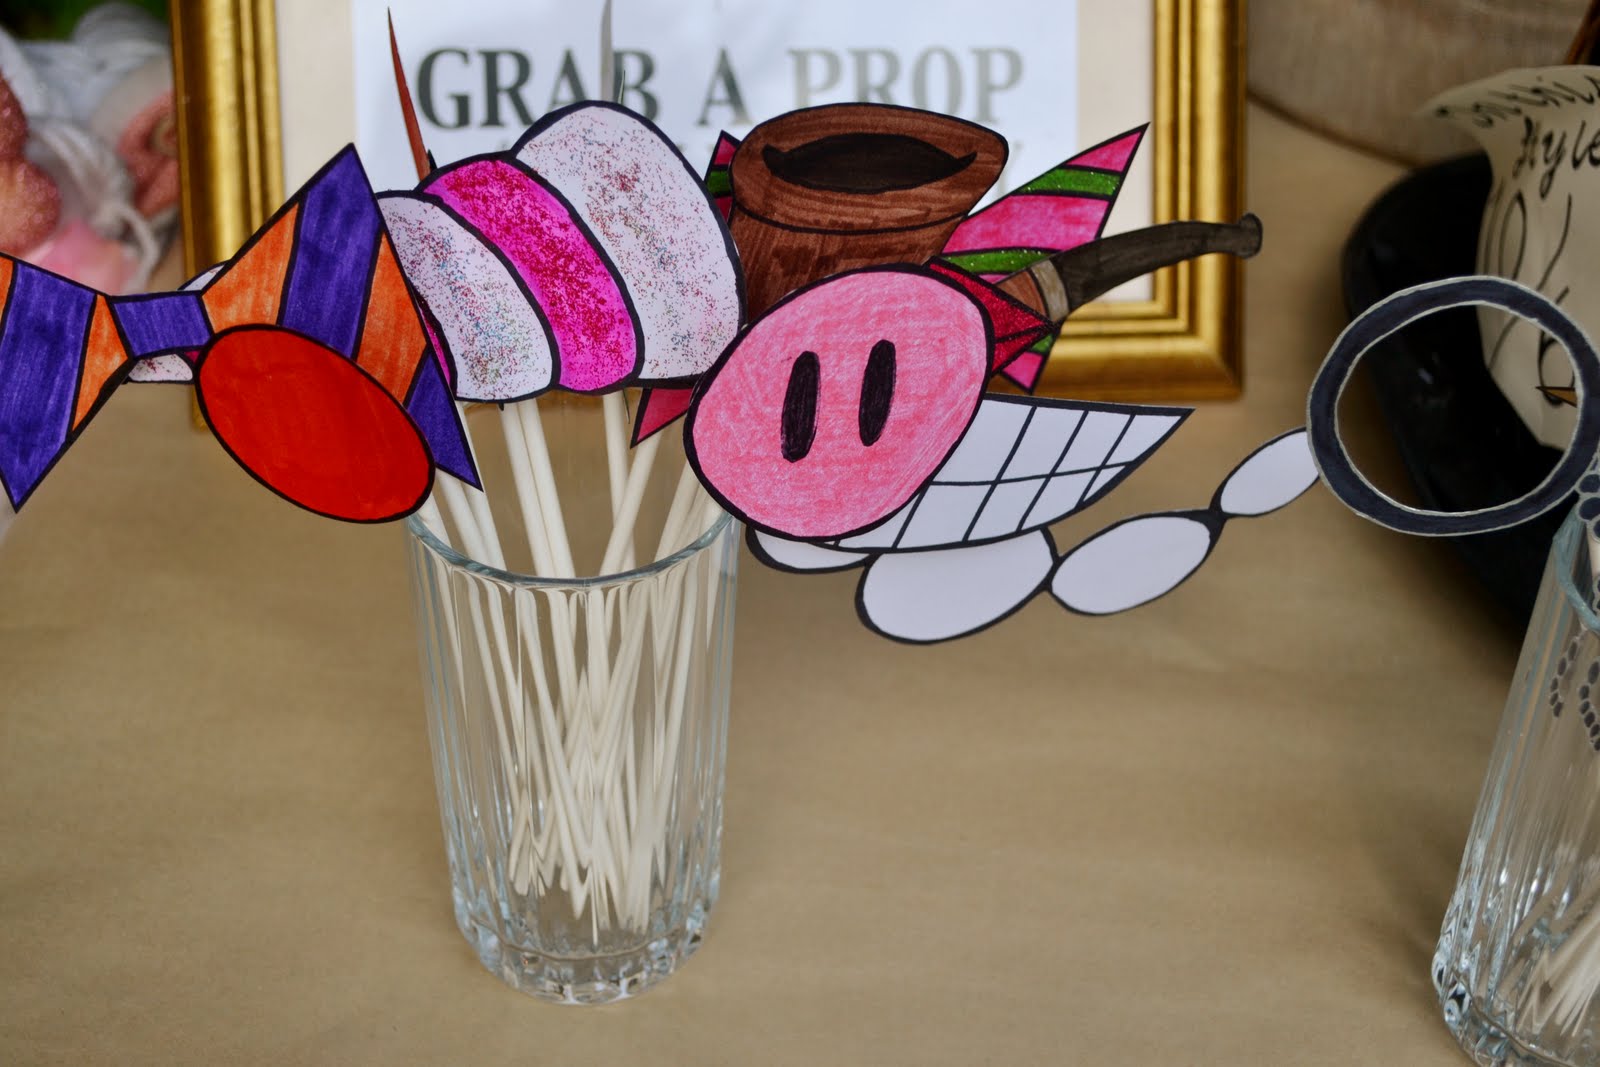
All the props turned out so wonderfully!  They were funny, cute, silly, and colourful.


Among other things, there were many moustaches to choose from.


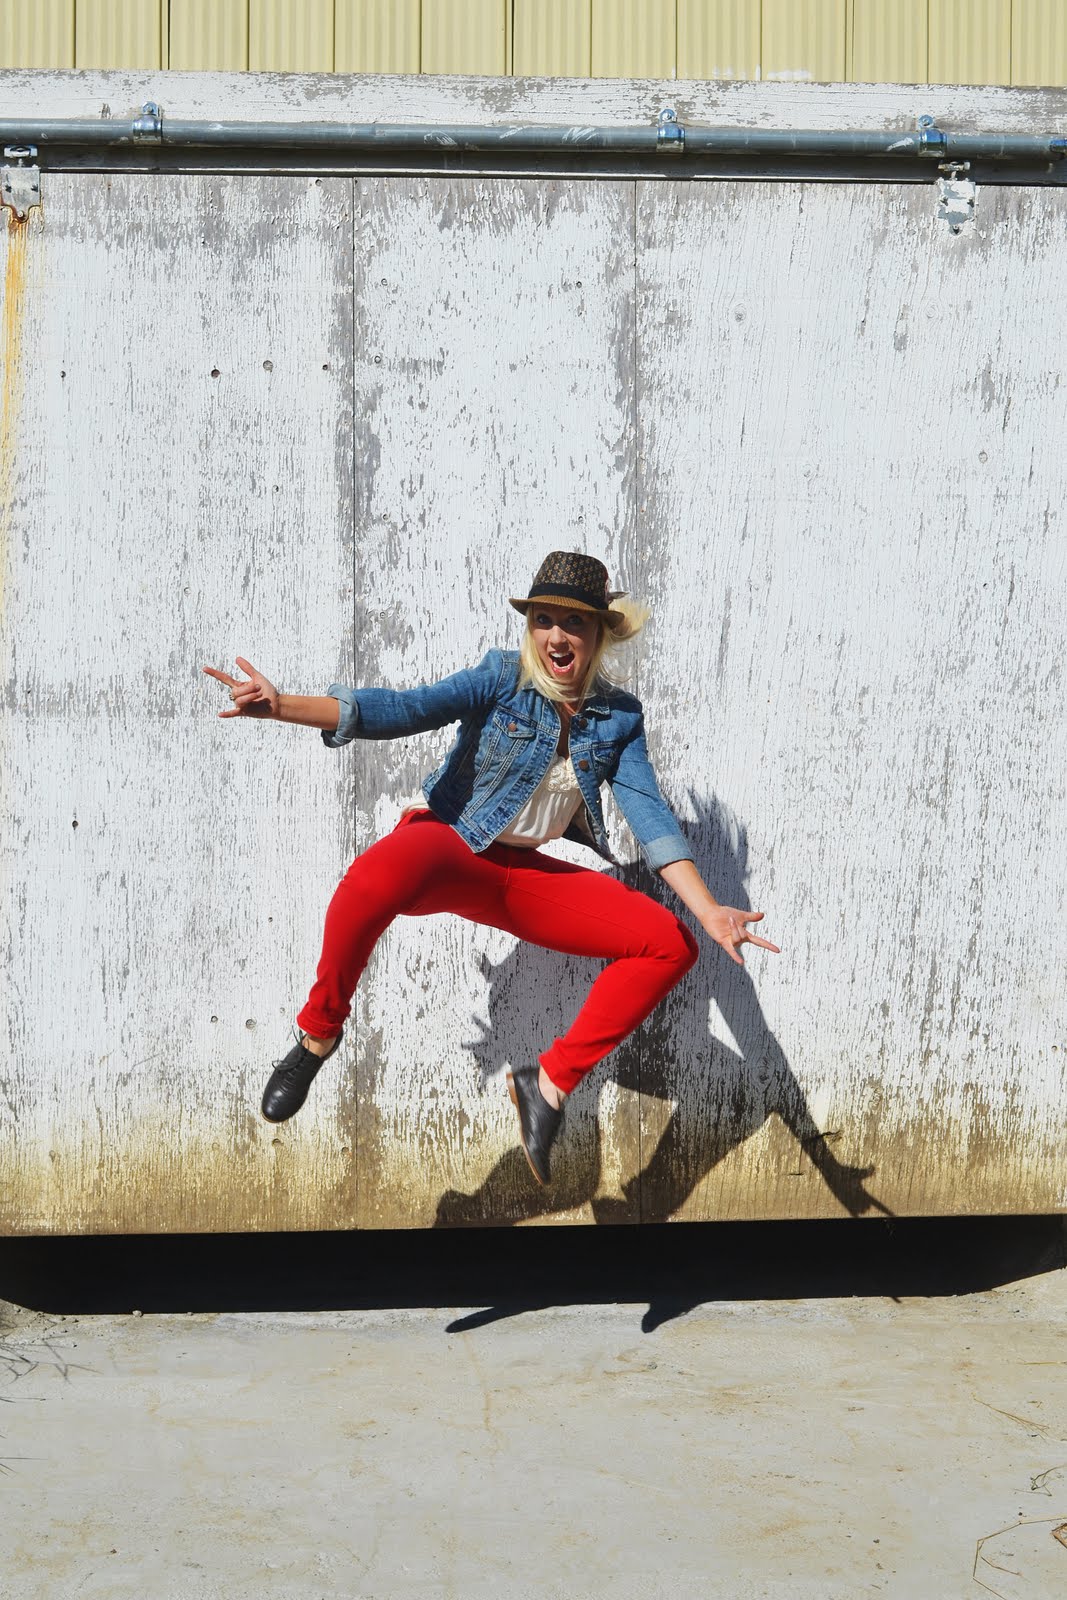
Kelsey, Ashley and I had a great time using the props!!

The photo booth made my party a success.  I set up my camera on my tripod and left it there all night for people to take photos with.  Let's just say at the end of the evening I had so many awesome pictures to go through.  People got very creative, and I think everyone had a blast.

p.s. jordyn♥

Wednesday 29 August 2012

in love with : olafur arnalds

 I'd like to introduce you to one of my musical crushes...the incredibly talented Icelandic composer: Olafur Arnalds.
I could listen to Arnalds' compositions for hours...wait, correction. I DO listen to his compositions for hours! His music is so beautifully unique. Using a classical foundation of chamber music and piano, Arnalds does amazing crossovers into pop by incorporating electronics, creating wonderful cinematic pop pieces. I am seriously in LOVE. The way he meshes in piano, synth, and strings is so gorgeous and every piece turns into an emotional journey. 
I love that one of my favourite shows (So You Think You Can Dance) has used his compositions several times throughout their seasons and that he's been the opener for Sigur Rós, another favourite musician of mine. If you love SYTYCD, go check out Jordan & Tadd's dance from season 8 and watch Amelia & Will's dance from this season. They're both beautifully choreographed and showcase the music so well. 


I think I'll grab a cup of tea and my latest book and enjoy some Olafur now =]

p.s.  clara ♥

Tuesday 28 August 2012

tasty tuesday: sangria iced tea


Now if you know me at all, you'll know that I'm really not a huge fan of coffee....and I don't even like tea.

Yes, I know.  What in the world is wrong with me?  Please understand that I WANT to be normal, and I really want to enjoy these beverages.  One day I would love to say to a friend: "Let's go out for coffee!" and for there to actually be a possibility of actually getting coffee!  But until that day I will have to settle for frapps from Starbucks....and very select iced teas.  Baby steps.


The first time I had Sangria Iced Tea was at a vintage market that my mom and I went to several months ago (I blogged about that HERE).  The lovely lady that was giving out samples of it was named Karla (from Karla's Specialteas).  Although I was a bit skeptical since it did have "tea" in the name, I gave it a go.  And it was so good!  I was officially hooked!  My mom and I promptly bought a tin of Sangria tea, as well as a few other flavors for her and Jordyn to try out.  They've absolutely loved all of Karla's teas so far, so much so that my mom is even planning on stocking them in our country store this fall!

(The picture above is of ice cubes that we made using the sangria tea....that way it wouldn't get diluted once they melted!)

This is the recipe straight from Karla....and is perfect for those hot Summer days.

Sangria Iced Tea
from: Karla

2 heaping TBSP of Sangria Tea
4 cups Boiling Water

Steep your tea for at least 5 minutes.  Sweeten with a bit of sugar while it's hot!  (Or with simple syrup if sweetening it when cold - simple syrup is just 1 part water, 1 part sugar....boiled until the sugar dissolves!)
Pour over ice and serve!

[Optional]: Add in fresh lemon, strawberry and/or orange slices!


Enjoy!

p.s.   kelsey


Sunday 26 August 2012

weekly wrap-up : love more


This week has been so packed full of wonderful goodness that I had a hard time trying to figure what to share! First off, I finished up my last week of my summer job (teaching tennis!) and received these little gifts from Dorothy, a girl I worked with all summer. Isn't the card adorable?! 

     I also finished editing this engagement shoot of my friend Jeff & his fiancee, Saige...

Caleb and I got decked out in our rain gear late one night to go on an adventure & check out a CRAZY thunderstorm...it was absolutely insane!
I made these pretty lace earrings for the diy this week...
I got this baby, which I am absolutely ecstatic about! And already madly in love with =)


We went down to Calgary & helped my parents move....and also visited with my grandma =)


& while in Calgary, I also met up with a dear friend of mine for a delicious eggs benedict brunch! It's lovely catching up with old friends... Janice & I have literally known each other since birth! Our mamas & papas were best friends, so it was just meant to be. Isn't she gorgeous?

And I found this lovely message that just made my day : love more. 
Simple & powerful and something I need to remember to do more every day. 


p.s.   clara

Saturday 25 August 2012

outfit post: red pants and a fedora

Sometimes you get in a style rut, and you need a fresh pair of eyes to help you create new outfits.

Yesterday I frantically ran into Kelsey's room saying "I'm supposed to do an outfit post tomorrow but I've used all my good outfits!"

She calmly took me back into my room and start pulling clothes out of my closet.


We decided to style my outfit around my red pants.  Since my pants were so loud she picked basic cream coloured tee with a bit of detail around the collar. 


 She paired this with a classic denim jacket.


We added the hat for personality, tying in the red feather with the pants.   


I think this will be my back to school outfit.  Still a bit summery, but warm enough for the fall!


A friend of mine bought these shoes, but they were too small for her!  So she kindly gave them to me.


I absolutely love this fedora!


Of course I had to do a jumping photo!  I call these my superhero pants because they are so bright, and remind me of Spiderman's suit... And this is my Spiderman pose!

So thank you to Kelsey for picking out this outfit, and taking the photos.

p.s.   jordyn

Friday 24 August 2012

in love with: moustaches

I really like facial hair.  

I'm not exactly sure when this strange obsession started.  But start it did.


Image found here.

Not only do I love cartoony facial hair, but real life facial hair as well!

A couple years ago my dad started growing out a hockey playoff goatee kind of as a joke, but my family loved it so much we begged him to keep it after the playoffs were finished.  I believe it makes him look quite dapper!


Image found here.

There is something just so charming about these little guys.

Image found here.

My birthday is coming up this week, and Kelsey came up with the genius idea of having a moustache theme birthday party.

So we have been brainstorming ideas (aka searching pinterest) for all sorts of moustache themed food and decorations we can make!


Image found here.

I am really hoping these straw toppers make an appearance.


Image found here.

I sincerely hope I get this moustache ring for my birthday.  It is a bit creepy, but I love it!


Image found here.

I wish I could bring my moustache to work every day!


Image found here.

We really do love gentlemen.  Especially those with outstanding facial hair!!

I can't wait for my birthday party this weekend!  I am sure you will see a blog post about it eventually.

I hope you all enjoy the pictures of moustaches as much as I did, and may you have a moustache filled weekend!

p.s. jordyn♥

Thursday 23 August 2012

diy : lace earrings

Normally, I would totally leave the jewelry DIYs for Kelsey (since she's got such an eye for these things & is a total pro!), but when I saw this DIY over at this blog, I knew I just had to try this! My obsession with lace and the simplicity of this diy makes this post sooo exciting and I absolutely love how the project turned out!


{   I   N   S   T   R   U   C   T   I   O   N   S   } 

1. Carefully cut out your lace into your desired shapes. I tried several different combinations with mine.

2. Paint mod podge on your lace cut-outs on a hard surface (preferably plastic). 
    Make sure you get all the edges and little holes!

3. Dry out the mod podge covered pieces on a plastic surface (makes it easier to peel off once they're dried).

4. Using pliers, attach your lace pieces onto the earrings. 

Aren't these just darling?! 

I'm so excited to wear these for the rest of summer and into the new school year =)

p.s.   clara

Tuesday 21 August 2012

tasty tuesday: best chocolate (cup)cakes


The recipe I'm about to share with you is very near and dear to my heart.  I discovered it many years ago when I was just starting to really get into baking more, and made it mostly due to the name..."Wacky Cake".  Weird, right?

Well, that turned out to be one of my best decisions I've ever made.  Wacky Cake is now our go to chocolate cake recipe, and hasn't ever failed us yet!  It's moist and fluffy and rich, and completely no-fuss, which I love.  One interesting thing about this cake is that it doesn't contain any eggs....so, as long as you use vegan margarine (oil works well too), this recipe can be vegan.  I have a couple of friends that are vegans (or can't eat eggs!), and I love having such a good recipe that works for them too!


Chocolate Cake
  (adapted from Our Treasured Recipes by Central Heights MB Church)

Ingredients:
3 cups Flour
2 cups Sugar
2 tsp Baking Soda
1 tsp Salt
2/3 cup Cocoa
1 TBSP Vanilla
2 TBSP Vinegar
3/4 cup Margarine (melted)
2 cups Warm Water

Instructions:

1) Mix together all dry ingredients; then pour all wet ingredients over top and mix until moist.
2) Pour batter into 9x13 pan /or 2 round pans /or cupcake tins (makes about 24-30 cupcakes)
3) Bake at 350: for 35-40 minutes for cake [or until a toothpick comes out clean] OR:  for 20-25 minutes for cupcakes.

Click HERE for the buttercream icing recipe!


The original recipe says to make three wells in your dry ingredients, and then fill each of them with vanilla, the melted margarine, and the vinegar.  Then, you pour the warm water over top, and mix together.  While I'm assuming this is the "wacky" part of the cake recipe, it doesn't matter if you just mix it all together. 

However, I still kind of like making the wells....


Your batter will be really runny....so don't freak out!  That means you did it right!


Jordyn and I usually use an ice cream scoop to make scooping the batter into the cupcakes tins easier, but you can also fill a large glass measuring cup and pour the batter in!


We like pretty tall cupcakes, so we usually fill our tins about 3/4 of the way full.  If you'd like slightly smaller cupcakes you don't have to add as much...just keep an eye on them in the oven, as they'll bake a bit faster!


Once the cupcakes had COMPLETELY cooled, I whipped up some basic buttercream, tinted it pink with a little bit of pink gel food colouring!  I finished them off with the most darling gold stars that I got for Christmas from my mom....she knows me so well!


This is such a quick recipe to whip up, so give it a try, and let us know how it goes!

And, if you don't feel like whipping up an entire batch, you can always make cupcakes for two!  
{This is the recipe that I adapted for that post!}


Cupcake days are the best kind of days.


p.s.   kelsey
Related Posts Plugin for WordPress, Blogger...